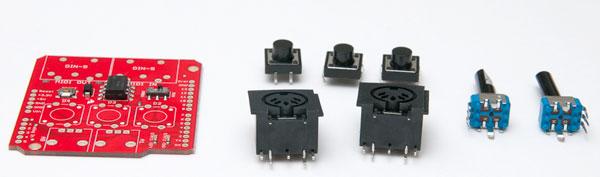
I ordered the Sparkfun Midi Shield from Amazon for a bargain £15. The postman brought the neatly packed kit the next morning. Time for a bit of soldering. Sparkfun’s kit is designed to plug into your Arduino board ready for some MIDI programming. All the surface mount devices are already soldered into place. The remaining parts need to be soldered by the purchaser. Here’s what comes in the pack.
There’s a pre-soldered board, three click switches, two MIDI sockets and a couple of rotary pots.
I also have a set of header pins at the ready – not included in the kit.

There are no instructions in the pack so here’s how I put it together.

Solder the two sockets into place, I used masking tape to hold them flat to the board as it was being fixed down.

I then soldered in the three switches and two rotary pots. There are a couple of large tabs on the pots. I soldered these down as well just to hold the pot into place.

Last step, adding the header pins. To make sure that they are lined up accurately for the board, I started with rows of pins, cut to length, fitted into an arduino.

To finish off, I dropped the shield into the pins and soldered it down.

Done! Next, testing.